Hi guys! I know that I had promised you a post about the Black Hills of South Dakota, but I'm being a bit more selfish today. I don't usually ask for anything from you all other than for you to secretly lurk in the dark corners and read my blog (yes, I know some of you out there are lurkers-- no shame in that!) and the occasional witty comment. Both are equally fantastic and I appreciate lurkers and witty commenters oh so much!
So today instead of giving you something super duper worthwhile for you lurkers to read and you witty commenters to comment on, I'm asking you to vote for my school to help us earn some money from Target. In case you forgot, I'm not just a card designer and a badass blogger, but I'm also a teacher. (I know I forgot, and reality is hitting me square in the face today as I go back to start setting up my classroom.) Anyway, your help would be greatly appreciated. Please go to this link and vote for our school and pass on the word if you can! Any dollar amount that we can get helps and the more votes we get, the more money we can get. And you can go back to vote again in six days if you'd like to help us out a little bit more! Vote, vote, vote! And I will thank you all from the bottom of my heart.
Ok, I'm done. I promise next time I see you all on this lovely blog I'll have something for you lurkers to read and you witty commenters to comment on. ;)


Monday, August 20, 2012

Thursday, August 16, 2012
South Dakota is Pretty Bad
If there is one thing that was reiterated on this road trip yet again, it was that South Dakota is actually a pretty amazing state. Never thought I'd say that, huh? Not something you hear on a regular basis, but I'm sticking with it because our time there was phenomenal. Andrew couldn't stop commenting on the diversity of the land within just one state, and he is spot on about that one. Don't understand the pun in this post's title, just keep reading.
After our stay in Indiana, our first stop was an overnight in Sioux Falls, South Dakota. We had made great time in driving so we had a few extra hours to spare after we checked into our hotel. What was meant to be just an overnight place to sleep before we moved on turned into a fantastic side adventure. We found the main park in Sioux Falls which was indeed the falls of the Big Sioux River and also home of the ruins of the Queen Bee Mill. It was the perfect place to take a walk and enjoy being outside after being stuck in the car all day.
 We then set out to find a place to eat. We were surprised by the downtown revival that was happening in Sioux Falls and there were plenty of fabulous looking restaurants to choose from-- not at all what we were expecting! We found a place called JL Beers which seems to be a very small local South Dakota franchise. We had great burgers and got the chance to try a flight of beer that included all beer from Montana, Wyoming, South Dakota and the like-- nothing that we'd had before.
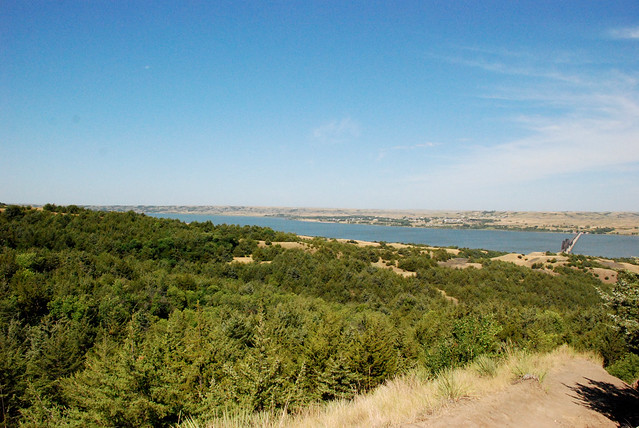
The next morning, we moved onward. We stopped briefly at a Missouri River overlook near Chamberlain, South Dakota before moving on to our first National Park stop.
As we drove toward Badlands National Park, we were greeted by flatter grasslands. Seeing the arrival of the Badlands is incredible. The Badlands have been formed over years of erosion where a lake bed once nested. As you arrive, you're amidst grasslands and suddenly see a huge drop in the land where the Badlands are carved out.
 We spent about two hours hiking on two separate trails, but spent the rest of the day on a scenic drive through the park, stopping at points of interest. Having been here three times now, I have to admit that this is the only way to do the park and survive. They aren't called the Badlands for any old reason-- they're truly bad. And on the day we visited, it was a whopping 107 degrees. I am still in awe of how harsh this land is and how immense its formations are. Just take this photo for example-- can you spot Andrew on our hike?

The change of colors and shapes within the formations are incredible as well.


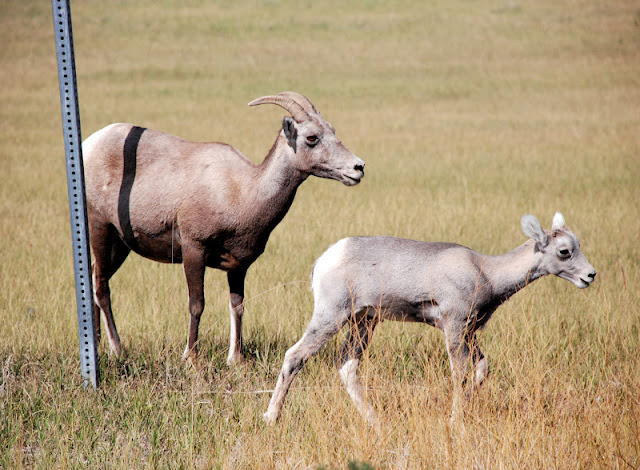
 We also had our first wildlife sightings in the Badlands. Last time I had visited I was lucky to spot two big horn sheep climbing in the craggy rock in the distance, but this time we were even luckier to see a group of them munching on the grass by the side of the road. And there were lots of little baby big horns too!
 Andrew spotted a bison in the distance-- the first he'd ever seen in the wild (I'll save the bison photos for Yellowstone as we have a pretty fantastic story to go along with the bison we saw there). And of course, the prairie dogs were everywhere.
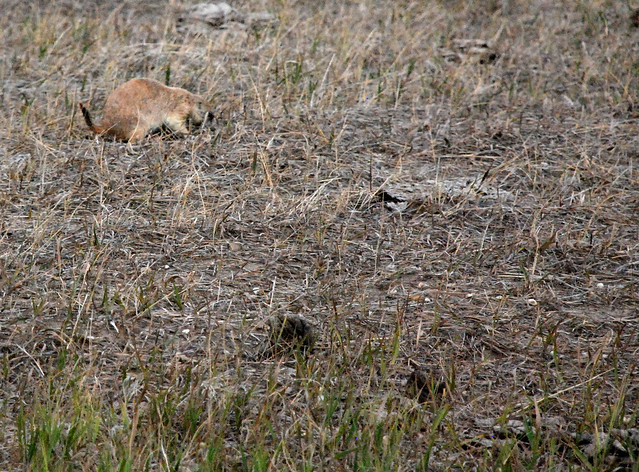
 True story-- there is a reason for the Bruce Hornsby song Prairie Dog Town. Only someone who has visited the Badlands would fully understand.
Needless to say, after our Badlands adventure we headed on to the beautiful Black Hills of South Dakota. More on that next!
After our stay in Indiana, our first stop was an overnight in Sioux Falls, South Dakota. We had made great time in driving so we had a few extra hours to spare after we checked into our hotel. What was meant to be just an overnight place to sleep before we moved on turned into a fantastic side adventure. We found the main park in Sioux Falls which was indeed the falls of the Big Sioux River and also home of the ruins of the Queen Bee Mill. It was the perfect place to take a walk and enjoy being outside after being stuck in the car all day.

The next morning, we moved onward. We stopped briefly at a Missouri River overlook near Chamberlain, South Dakota before moving on to our first National Park stop.
As we drove toward Badlands National Park, we were greeted by flatter grasslands. Seeing the arrival of the Badlands is incredible. The Badlands have been formed over years of erosion where a lake bed once nested. As you arrive, you're amidst grasslands and suddenly see a huge drop in the land where the Badlands are carved out.


Needless to say, after our Badlands adventure we headed on to the beautiful Black Hills of South Dakota. More on that next!
Wednesday, August 15, 2012
A Wood-Fired Pizza Feast in Indiana
Driving to Wyoming and back is no small feat when you live in Maryland or anywhere on the East Coast for that matter. Our final stops on our vacation were Yellowstone and Grand Teton National Parks, but we decided to take our time getting there so that we wouldn't burn out before we got there. Our trip started with a short drive to Cleveland to stay overnight at Andrew's parents' house, drop Lilah off for the next two weeks, and to pop in for his cousin's wedding ceremony. After the ceremony (which ended up being a full Greek Orthodox mass-- that was a new one for both of us!), we took off to Indiana to visit my parents.
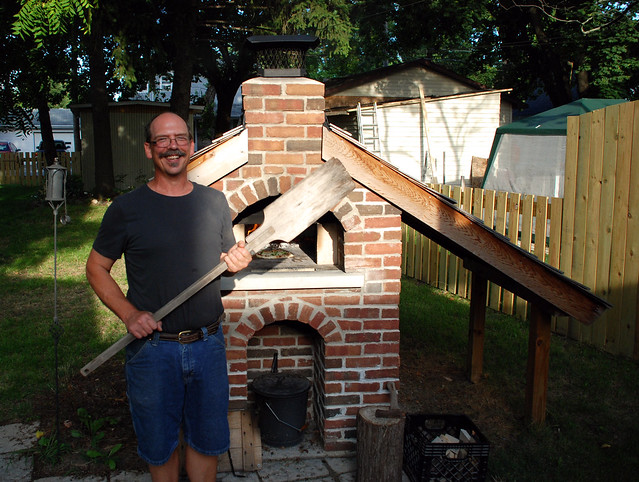
A visit with my parents in the summer now seems synonymous with relaxing time with good food. As you may know, my mom is a baker and uses a wood-fired oven that my dad built at her bakery for a large portion of the breads that she bakes. She also offers other delicious food items from time to time that are produced in her wood-fired oven. My parents loved the oven at the bakery so much, that my dad decided to build a second one in their back yard a couple years ago. This means that if the weather is nice, there is surely to be a wood-fired oven feast to be had while visiting.
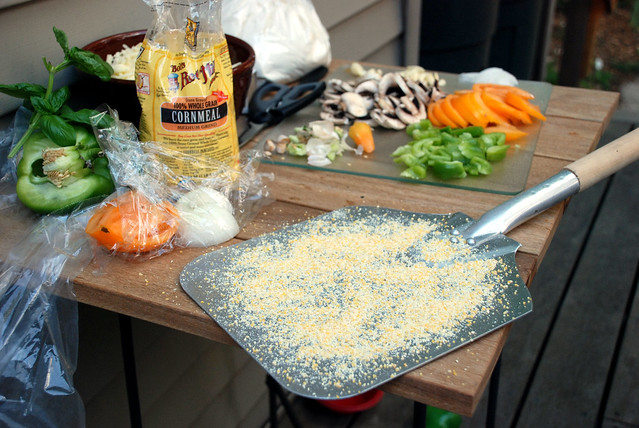
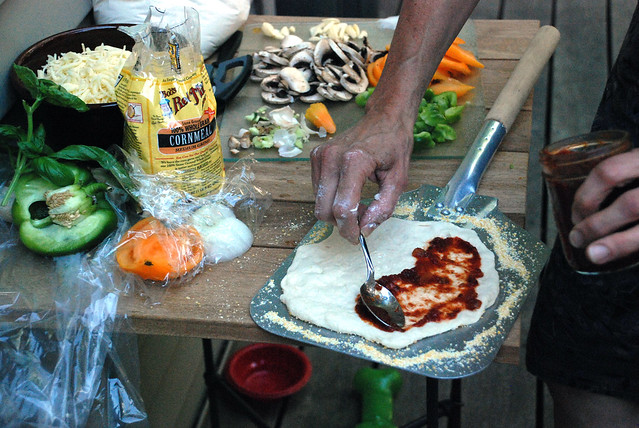
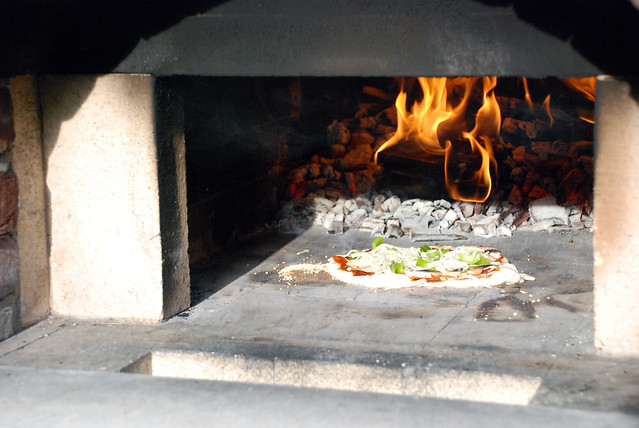
This time, we enjoyed wood-fired pizza and a fresh salad full of veggies from my mom's garden. My grandmother came to join us in our feast as well. To be honest, there is little that compares to food that comes out of a wood-fired oven-- the flavors are just amazing! It was nice to split up our drive west relaxing on the patio, meeting my parents' new dog Stella, seeing my grandmother, and eating amazing food.


 Food has always played an important role in my family, and this visit was no different. These sorts of visits are always something to look forward to.
After our quick, two night stay in Indiana, we hit the road again and made our way to South Dakota. Stay tuned for photos from the next part of our trip!
A visit with my parents in the summer now seems synonymous with relaxing time with good food. As you may know, my mom is a baker and uses a wood-fired oven that my dad built at her bakery for a large portion of the breads that she bakes. She also offers other delicious food items from time to time that are produced in her wood-fired oven. My parents loved the oven at the bakery so much, that my dad decided to build a second one in their back yard a couple years ago. This means that if the weather is nice, there is surely to be a wood-fired oven feast to be had while visiting.
This time, we enjoyed wood-fired pizza and a fresh salad full of veggies from my mom's garden. My grandmother came to join us in our feast as well. To be honest, there is little that compares to food that comes out of a wood-fired oven-- the flavors are just amazing! It was nice to split up our drive west relaxing on the patio, meeting my parents' new dog Stella, seeing my grandmother, and eating amazing food.
After our quick, two night stay in Indiana, we hit the road again and made our way to South Dakota. Stay tuned for photos from the next part of our trip!
Tuesday, August 14, 2012
I'm Back!
Just popping in to say hi to all of you amazing readers that have stuck around during my absence. (I totally wrote "pooping in to say hi" by accident on the first go round. Don't think you guys would have been up for that!) I don't blame you for having stuck around since I had some amazing ladies filling in for me while I was on vacation. I do hope that you shared the love and checked out each one of their blogs! I can already tell that it's going to take me a while to get back into the swing of things here after being out of touch with civilization for a long while. Several weeks in some of the most wild parts of our country can do that to a person. As of right now, I'm working on getting together some of our photos from our trip and also preparing my mind for the fact that the school year will soon be starting up again in a week and a half. (Definitely not ready!) So for now, I'll leave you with the first of many photos to come. This is our first glimpse of Yellowstone when we arrived. I'll try to give you a park by park tour once I've picked out my favorites from our trip.
 Here's to hoping that all of your are well! Looking forward to diving back into this fabulous blogging community!
Friday, August 10, 2012
The Ampersand and Free Printable
Hi friends! My name is Patti Wunder and I'm
usually found over at Easton Place. I'm filling in for the day. (Thank
you, Heidi, for allowing me to join the bloggy goodness here at Row
House 14)
Today I offer you a fun printable and a tiny little history lesson.
The Ampersand!
Did you know...
- Its original form was based on the Latin word “et”, meaning, logic will tell you, “and”.
- As it was used in manuscripts in the following centuries, the shorthand form for writing it developed into what we see today.
- At one point it was incorporated into the English alphabet (
unofficially, as always with English) as “and”, making 27 letters. - When reciting the alphabet, it was correct to say “and per se and” (and for itself, i.e. not introducing another item to the list).
- This cumbersome “and per se and” got truncated into “ampersand”, which is its official name as of today. (thank you Trusted Translations for this info)
Today, the ampersand is loved by people from all walks of life, and has become an unofficial mascot of designers world wide.
Take a look at this sampling of Pinterest boards devoted to the love of the ampersand:

In honor of The Ampersand, I offer you this free printable.
I hope it inspires you as it has inspired me.

To download a PDF of the printable, simply click on the image.
Thanks for reading!
Wishing you all a day filled with inspiration.
xoxo
Patti
Thursday, August 9, 2012
Soup and Beans and Low-Meat Meals
Today we begin the long trek home from Grand Teton National Park. It is so sad to say goodbye to these beautiful mountains, but it will be wonderful to get back home. My bloggy friend Kristen from milo and molly is taking over the blog today while we make our way back home. And to you, dear friends, I will see you sometime next week after our three day driving fest comes to an end.
Hello, lovely Row House 14 readers! I'm Kristen and I am a stay-at-home mom of two and owner of the Etsy shop milo and molly, where I sell paper goods and sewn gifts, and I also keep a blog by the same name where I chronicle our never-ending house projects, shop stuff, recipes, sewing projects and the like.

On my blog recently I posted a plea for low-on-meat or meatless recipes. You see, we are a meat-loving family, but in an effort to trim the fat (ha ha) from the budget and eat a little lighter, I'm trying to gather recipes using more beans, lentils, pasta, and so on. I had some wonderful comments left, recipe links tweeted to me, and one lone soul used my link-up (thanks, everyone!).
I decided I wanted to update my readers on some of the recipes I tried, and then I got a really great idea, and then Heidi said she was going on vacation and would I like to guest-post, to which of course I said yes, and so I thought that this might be just the right place to share my idea while also begging for more recipes.
So, first an update on what I've made:
One recipe suggested by Paige was Ham and White Beans done in the slow cooker. I have grown to love my slow cooker. We are on the type of schedule where we decide to run to Home Depot or some other house-related errand at four o'clock in the afternoon, getting us home right when we should be eating. With the slow cooker, dinner is pretty much made and I can just serve it up. Time saver, sanity saver. This meal was delicious and I highly recommend it. Notes: I did not have a ham bone. I used a half a pound of cut up deli-sliced ham instead and it was just fine. I also added asparagus so vegetables would already be included, and because I'm not great with cooking asparagus so I figured the slow cooker would take care of that (it did).


I've decided I'm not cooking beans any other way. My hubs loves real beans, as in a bag of dried ones and not the already cooked ones in a can. I actually like them better too, and they're better for you, but you have to plan ahead for them by soaking them overnight and then they need to cook the day of generally between 1-2 hours. Since dinner planning around here often occurs at dinnertime, real beans doesn't always work. I'm telling you, all you do is put your beans in the slow cooker, cover them with 4-6 cups of water and let them go for 8 hours on low. Talk about set it and forget it.
I also made this Food Network favorite, which yields plenty of leftovers. I always serve it with prosciutto bread, which is probably the reason we like the soup so much in the first place. The photo below is from the reboot lunch the next day because I totally forgot to snap a shot that evening. As you can see, no bread in sight. They're both so easy and so good, and this soup is packed with veggies.


I saved all the recipe suggestions plus some others I've found on two new Pinterest boards: Slow Cooker and Soup and Beans, which is actually more than just soup and beans but I liked how it matched the name of the original post. This is when I got my great idea. I would love to make those two Pinterest boards collective boards, shared by us all to pin for the common good of busy people who want to slow cook their beans or eat a lot of soup. If you make something, you can leave a comment on the pin and tell us all how it went. Fun, right?
If you'd like access to the board, please comment with your Pinterest user name and I'll add you on as a pinner! (I think that's how it goes. I haven't made a collective board yet.) The only rule is no deleting a recipe that's been posted. If you're more comfortable, feel free to e-mail me at milomollyshop (at) gmail (dot) com. If you have a recipe to share, please post a link in the comments, or tell me what it's made of, or come by my post and comment or link-up.
Thanks for hanging out with me today, and I hope you'll come by and visit!
--------------------
Hello, lovely Row House 14 readers! I'm Kristen and I am a stay-at-home mom of two and owner of the Etsy shop milo and molly, where I sell paper goods and sewn gifts, and I also keep a blog by the same name where I chronicle our never-ending house projects, shop stuff, recipes, sewing projects and the like.

On my blog recently I posted a plea for low-on-meat or meatless recipes. You see, we are a meat-loving family, but in an effort to trim the fat (ha ha) from the budget and eat a little lighter, I'm trying to gather recipes using more beans, lentils, pasta, and so on. I had some wonderful comments left, recipe links tweeted to me, and one lone soul used my link-up (thanks, everyone!).
I decided I wanted to update my readers on some of the recipes I tried, and then I got a really great idea, and then Heidi said she was going on vacation and would I like to guest-post, to which of course I said yes, and so I thought that this might be just the right place to share my idea while also begging for more recipes.
So, first an update on what I've made:
One recipe suggested by Paige was Ham and White Beans done in the slow cooker. I have grown to love my slow cooker. We are on the type of schedule where we decide to run to Home Depot or some other house-related errand at four o'clock in the afternoon, getting us home right when we should be eating. With the slow cooker, dinner is pretty much made and I can just serve it up. Time saver, sanity saver. This meal was delicious and I highly recommend it. Notes: I did not have a ham bone. I used a half a pound of cut up deli-sliced ham instead and it was just fine. I also added asparagus so vegetables would already be included, and because I'm not great with cooking asparagus so I figured the slow cooker would take care of that (it did).


I've decided I'm not cooking beans any other way. My hubs loves real beans, as in a bag of dried ones and not the already cooked ones in a can. I actually like them better too, and they're better for you, but you have to plan ahead for them by soaking them overnight and then they need to cook the day of generally between 1-2 hours. Since dinner planning around here often occurs at dinnertime, real beans doesn't always work. I'm telling you, all you do is put your beans in the slow cooker, cover them with 4-6 cups of water and let them go for 8 hours on low. Talk about set it and forget it.
I also made this Food Network favorite, which yields plenty of leftovers. I always serve it with prosciutto bread, which is probably the reason we like the soup so much in the first place. The photo below is from the reboot lunch the next day because I totally forgot to snap a shot that evening. As you can see, no bread in sight. They're both so easy and so good, and this soup is packed with veggies.


I saved all the recipe suggestions plus some others I've found on two new Pinterest boards: Slow Cooker and Soup and Beans, which is actually more than just soup and beans but I liked how it matched the name of the original post. This is when I got my great idea. I would love to make those two Pinterest boards collective boards, shared by us all to pin for the common good of busy people who want to slow cook their beans or eat a lot of soup. If you make something, you can leave a comment on the pin and tell us all how it went. Fun, right?
If you'd like access to the board, please comment with your Pinterest user name and I'll add you on as a pinner! (I think that's how it goes. I haven't made a collective board yet.) The only rule is no deleting a recipe that's been posted. If you're more comfortable, feel free to e-mail me at milomollyshop (at) gmail (dot) com. If you have a recipe to share, please post a link in the comments, or tell me what it's made of, or come by my post and comment or link-up.
Thanks for hanging out with me today, and I hope you'll come by and visit!
Wednesday, August 8, 2012
Travel the World Wednesday: National Parks
Hello Row House readers! This is Rachel from rwkrafts and I
am very excited to share a travel post with you all. Heidi is going on a very
long road trip across the country to visit some of our nation’s most famous
National Parks. Here are some beautiful photographs of my favorite places I had
the opportunity to go to (usually hiking and camping style!) when I was
younger…
So pack your bags, we’re going to the Grand Canyon and
Yellowstone National Park!
It’s only natural that I start with the pride of my home
state, Grand Canyon National Park.
Countless camping trips, with family or with high school friends, were
spent at this fabulous spot.

Photograph by George
Stocking for Arizona Highways magazine
A favorite hiking spot in the canyon is the gorgeous Havasu
Falls…

Photograph by Paul
Gill for Arizona Highways magazine
Let’s continue the travel to a park I know Heidi is headed toward… Yellowstone!

This is the Grand Prismatic Spring in Yellowstone National
Park. It is stunning to look at, but disgusting to smell! I hope Heidi has
packed some little face masks, because the sulfur that makes these hot springs
gorgeous also smells like the world’s largest rotten egg. It’s definitely an
experience I will never ever forget!
I have no doubt Heidi will see a TON of these…

Photograph by Terry Donnelly
for National Geographic
… a good amount of these…

Photograph by C.
Judson
… and maybe one or two of these…

Photograph by Miller
I hope Heidi is enjoying her epic road trip, and I just know
she will have some gorgeous photos to share with us when she returns.
Thanks for traveling with me today, and thanks to Heidi for
having me along for the ride :)
-Rachel w k
Monday, August 6, 2012
Make It ::: Two-Toned Wooden Studs
Hello Monday and week two of our grand adventure out west! We've made it to the Tetons in Wyoming and they are ever so gorgeous! I wouldn't want to leave you all hanging so I have something extra special for you today. Stela from Stelabird is sharing one of her fabulous Make It posts that she has created just for you fabulous readers (and I'm pretty sure I need to make these. I actually have the supplies written down on a list at the moment!). Stela is one of my favorite bloggers and is pretty much all around fabulous, and most of the time I drool over her little shop in Oklahoma. Please do go visit her blog! So without further ado...
Hi Row House 14 readers!
I'm Stela from the blog Stelabird and I'm so happy to be visiting here and sharing a DIY project with you!

Today I'm sharing with you how to make these two-toned wooden stud earrings! These were inspired by Kate Spade's Rosewood Dot earrings. They are simple and fun to make. Plus, they are super cool.
Let's get started!
Let's get started!

You will need:
acrylic paint
paint brush
glue
masking tape
wood dowel caps
earring posts


Put your masking tape on the dowel cap where one half is completely covered and the other half is exposed. Paint the exposed piece of wood.

Let it dry and paint a second or third coat if needed.

Peel off the tape carefully once the paint has dried.

Now it's time to add the earring posts! Add a dab of glue to your post and attach to the bottom of your dowel cap. If you're using E-6000 glue let it dry for 24 hours for maximum hold.

Ta daaa!! You're done and now you have some sweet earrings to sport!


I hope you enjoyed this little tutorial! To see more of my Make It post, click HERE. Thank you so much for having me Heidi!
♥
Friday, August 3, 2012
Repurposed Wine Bottle Tutorial
It's Friday! We're one week into our road trip and we've made it the whole way to Yellowstone National Park. Tonight we're staying in Grant Village which is in the southern end of the park near Yellowstone Lake and some fantastic geyser basins. While I enjoy the beauty around me, Julie from Julie Ann Art has been kind enough to step in and share one of my favorite tutorials of hers. Be sure to stop by Julie's blog to say hi-- it is one of my favorites and you won't be disappointed!
Hi guys! I'm Julie, from Julie Ann Art and since Heidi is off on a vacation (jealous!) I'm here to share this Repurposed Wine Bottle Tutorial with you!
When I came across this tutorial on Pinterest I got excited because I love DIY projects when I already have all the materials I need in my house! What 20-something girl doesn't have an empty wine bottle or two laying around? With a touch of spray paint, these bottles that are collecting dust can be turned into creative vases or candle holders. What a perfect idea for wedding table centerpieces or table numbers!
 What you'll need:
Wine bottle(s)
Spray paint primer
Spray paint (colored or chalkboard)
Embellishments of your choice
Cloth to spray paint on
What you'll need:
Wine bottle(s)
Spray paint primer
Spray paint (colored or chalkboard)
Embellishments of your choice
Cloth to spray paint on
 To remove the labels on the wine bottles, first soak them in warm soapy water for about 15 minutes. This will soften the labels and make them easier to peel off. If you have tougher labels you can run the bottle under warm water while scrubbing the label with a rough sponge. This is what I did and I was able to get all the labels off without the use of Goo Gone or rubbing alcohol.
 Once the labels are removed make sure to thoroughly dry the bottles before spray painting. To start, evenly coat the bottle with primer. Be sure to check the directions on the paint can for drying times. Once completely try, follow up with the color of your choice. Let the painted bottles stand for 24 hours and then add any embellishments you'd like, such as ribbon or bows.
 I put flowers in mine but wouldn't they also look pretty with candle sticks in them? That would set quite the romantic ambience on a wedding table! Enjoy!
---------------------


Wednesday, August 1, 2012
Five Ingredient Summer Pasta Salad
We're well into our trip by now spending tonight in Custer State Park in South Dakota after a day of hiking and visiting Mount Rushmore. Today I'm excited to have one of my fabulous bloggy friends Paige filling in for me. You all know how much I love food, so Paige volunteered to share a recipe with you all while I'm gone.
Greetings! I'm Paige from Little Nostalgia, filling in for Heidi while she's enjoying some R&R out west. Today I'm bringing you one of my favorite (read: easiest) new recipes for summer.

I'm a lazy cook. I'll readily admit that. I love to eat, and I've been watching the Food Network for years, but the actual cooking process still leaves me kind of cold. (I'd like the food to just magically appear before me, but that never seems to happen.) So when I do find myself faced with the task, I like to keep things as simple as possible.
Enter the Five Ingredient Summer Pasta Salad!
You'll need:
--8 oz. shell pasta (half a box)
--2 cans of tuna
--1 small to medium onion
--a few stems of parsley
--Italian dressing
The great thing about this recipe is that it's easy to double or triple if you're having a party. I only made this for the two people, so I kept the batch small.
What to do:
1. Cook the pasta. My only real cooking tip is to add a little salt to your water. Not only will it boil faster, but the pasta will taste better.
2. Drain the pasta and let it cool off for a while. Chop the onion and parsley if you haven't yet.
3. Mix together the pasta, tuna, onion, and parsley.
4. Add the Italian dressing (I did around 2 oz. but you can add more or less to taste) and stir again.
5. Let the salad chill in the fridge for a couple of hours. Then wolf it down.

See, easiest thing ever right? Now go on and make yourself some.
What's your favorite dish to have in the summer? Any other pasta salad recipes to share? Maybe you have another fun use for a plain ol' can of tuna?
---------------
Greetings! I'm Paige from Little Nostalgia, filling in for Heidi while she's enjoying some R&R out west. Today I'm bringing you one of my favorite (read: easiest) new recipes for summer.

I'm a lazy cook. I'll readily admit that. I love to eat, and I've been watching the Food Network for years, but the actual cooking process still leaves me kind of cold. (I'd like the food to just magically appear before me, but that never seems to happen.) So when I do find myself faced with the task, I like to keep things as simple as possible.
Enter the Five Ingredient Summer Pasta Salad!
You'll need:
--8 oz. shell pasta (half a box)
--2 cans of tuna
--1 small to medium onion
--a few stems of parsley
--Italian dressing
The great thing about this recipe is that it's easy to double or triple if you're having a party. I only made this for the two people, so I kept the batch small.
What to do:
1. Cook the pasta. My only real cooking tip is to add a little salt to your water. Not only will it boil faster, but the pasta will taste better.
2. Drain the pasta and let it cool off for a while. Chop the onion and parsley if you haven't yet.
3. Mix together the pasta, tuna, onion, and parsley.
4. Add the Italian dressing (I did around 2 oz. but you can add more or less to taste) and stir again.
5. Let the salad chill in the fridge for a couple of hours. Then wolf it down.

See, easiest thing ever right? Now go on and make yourself some.
What's your favorite dish to have in the summer? Any other pasta salad recipes to share? Maybe you have another fun use for a plain ol' can of tuna?
Subscribe to:
Posts (Atom)